Santa Claws
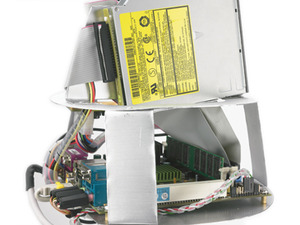
After having the general layout and structure set out, I was ready to work in the other pieces. I had already decided I wanted the optical drive to be mounted vertically so it would load through an aperture in the canopy. However, while I was busily fashioning the tray for the hard disk and DVD/CD-RW to fit in, James remarked that the optical drive might not work when mounted vertically. Panic set in, so I decided to dry-run the build outside the case to find out. As luck would have it the drive didn’t object too much to being used vertically - curses were uttered in the general direction of the Technical Editor and work continued.I set the drives in the upper tier of the chassis, leaving enough space between them and the motherboard for the PSU circuit board. This meant I could cut down on the amount of wire passing through the trunk section. Previously I thought I’d have to extend the standard ATX PSU wiring right through the trunk conduit to a stripped down, full-sized PSU in the base - thankfully this wasn’t needed.
Having made the chassis, all that was now needed was to attach the trunk and base sections. To pass the wires through the chassis plate I needed to hack out a hole in the motherboard tray, and guessing that measurements made with cardboard forms are not precisely accurate I opted to slice an edge off the tray section. Allowing the wires to pass down to the trunk gives some extra leeway for slight errors in the chassis construction.


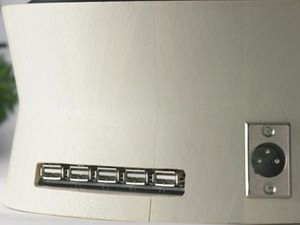
Left: I cut holes in the base for USB and power connections; Right: I opted for light-weight components
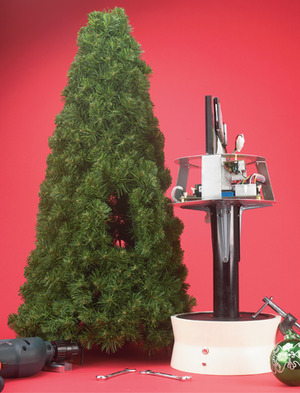
For the trunk I bought a length of two inch drainpipe which, while a little wide, provided a strong support for the canopy and chassis. After being cut to the correct length I hacked out a ‘U’ shaped section at the top and bottom of the pipe so that the cabling would pass through without interfering with other parts of the construction. After this I needed to find a good way of connecting the trunk to the base and the chassis, forming a strong and wobble free support for the canopy. Lacking a better solution I bought six small shelve supports which worked well.
 Next I cut holes in the pot for a USB hub, power input and monitor output, then drilled out spaces for speaker outputs, power and reset switches. With all the wiring done, all I needed to do was to put the canopy back together. First I chopped a foot or so off the bottom of the canopy, to slightly below where the chassis sits, making the tree as compact as possible.
 Then came the job of refitting the green plastic foliage to the chassis, which was slightly tricky as it needed to be tied to the frame in about a trillion places. It’s a job for slender fingers, which are noticeable by their absence on my hands. Much huffing and puffing later the canopy was finished and the tree was ready to assemble. Surprisingly, this went fairly smoothly, and the tree powered up first time, much to my satisfaction, and relief.
Boxing Day
The tree now spends its days in the CPC Labs where it’s used as simple Internet client and Network PC for transferring files to and from our server. It also happily plays CDs and MP3s, although currently Jingle Bells and White Christmas are not among its repertoire.However, it’s a little odd having a Christmas tree so long before Christmas - it gives you a strange feeling of shopping malls and scary plastic Santas. I also have a funny feeling that it might be difficult to take down come 12 January - I expect we will have to make it into a nice little shrubbery.
Update, December 2009: Josh's prediction proved true - the tree was difficult to take down. It was in fact, four years before we got rid of it, prompted into a clear out of the labs by the arrival of the bit-tech team!

MSI MPG Velox 100R Chassis Review
October 14 2021 | 15:04


Want to comment? Please log in.